Busy Weekend - Part 1
Last weekend I spent quite of time making cards (I also made a big batch of Chicken & Dumplings, yum!) and put all 6 on Instagram to enter in the various challenges. I’m just now getting around to posting here. Sorry!
Card #1
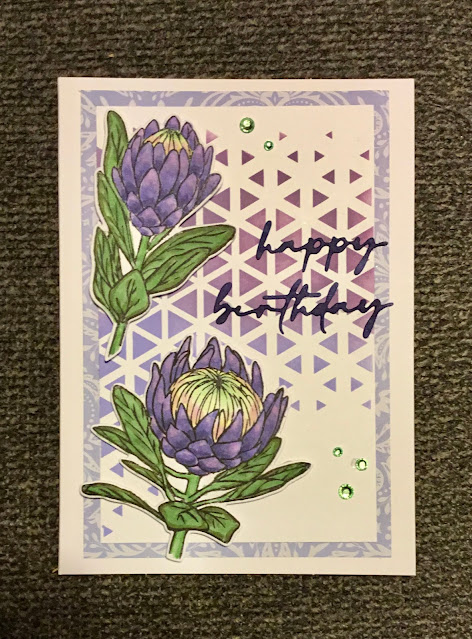
I made this card for the Pinkfresh Studios JANUARY 2021 CHALLENGE - 2020 Challenge in Review. We were to make a card inspired by one of their posts from last year.
I chose this card, created by Carissa Wiley, from the September 2020 Pinkfresh challenge.

I don’t have that die so I had to improvise. I do have the Pinkfresh slimline stripes dies and a set of rectangular dies that I thought I could use together to get the same look.
Since I decided to also use this card for the Lindy’s Color Challenge I used violet, deep blue, and soft gray for my color scheme.

I began by taking an approx. 6” x 8” piece of white cardstock and blending on Distress Oxide inks in Shaded Lilac/Wilted Violet, Weathered Wood, and StormySky/Salty Ocean in 3 sections. For the violet and blue I ended up blending together 2 colors to get what I wanted after my 1st choice didn’t quite cut it. I wasn’t entirely happy with how the blending turned out, but not enough to do it over. 😏
Next, I cut this into strips and glued them diagonally on 4 1/4” x 6” piece of white cardstock, leaving a space in-between each strip, and trimmed off the excess around the outside. Using a rectangular die, I cut a hole in the middle.
I used that mat to figure out where I wanted my stamp to go, and stamped the flower design in Catherine Pooler Juniper Mist directly on the card base.
After die cutting 2 of the happy birthday sentiments, I glued them together and heat embossed them using Ranger Navy embossing powder.
I put it all together on an A6 white card base and added some blue pearls.
Card #2
For the MFT Color Challenge 158 I needed to use this color scheme:

I decided to use the black and gray in the background and pink and fuschia in the design. The photo didn’t get the colors quite right. It really is fuschia & pink, not orange & red!

I made an A6 black card base and cut a gray mat to fit. I used a daisy stamp set, embossed it in white, and colored it in with watercolor pens.


Comments
Post a Comment