Posts

Showing posts from February, 2021

Mixed Media Tag

Image
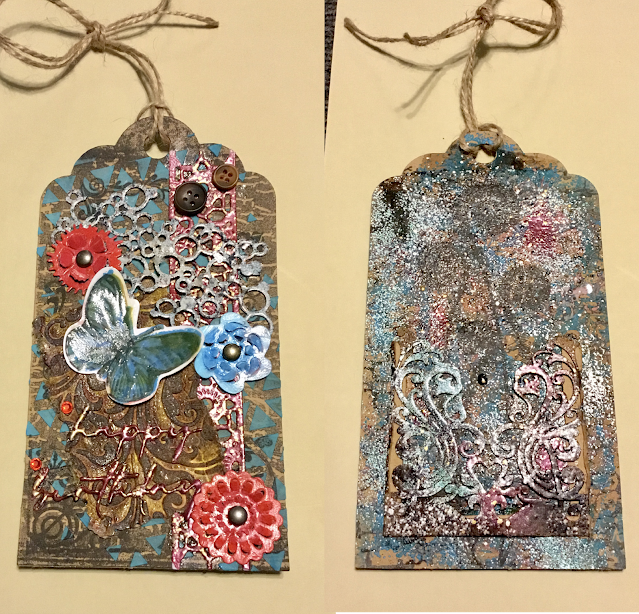
This week’s Monday Simon Says challenge was “ Anything But A Card ”. The only other thing I really wanted to do is make a tag. The STAY CRAFTY WITH HERO CHALLENGE #20 was to incorporate a gift card holder. So, I decided to make a double-sided tag with a design on one side and a card holder on the other. I also have been wanting to try doing some mixed media, so that is how I came up with this. I’m not going to go through all the steps it took, but just give some general information instead. I didn’t have any tags, so I had to make them on my Cricut Maker. I cut 2 tags from 100 lb. Kraft cardstock. This way I could do each side & glue them together. I also cut the card holder at the same time. The different techniques I used were: cutting with the Cricut Maker, stamping, modeling paste with stencil, die cutting, heat embossing, embossing with toilet paper, glazing with Glossy Accents, and coloring with Copic markers. The stamps I used were: the Crackle & Reverse Crackle Simo

Pansies & Lace

Image
The Altenew Flower of the Month was pansies or violets. I’m not happy with the way this one came out, it just didn’t come together well, but I’ll enter it anyway.  I downloaded a drawing of pansies that I used with Cricut print then cut, and colored it with Copic markers. Then I used a water brush, with some Distress Oxide Salty Sea that I pounced on an acrylic block, to fill in the background. I added some black speckles and went around the edge with Black Soot.  Next I embossed some toilet paper in an embossing folder that I pounced with Distress Oxide Dusty Concord on one side and Milled Lavender on the other. I used this tutorial by Carol Tinson .  After die cutting the lace edging, the lace circle , and the ‘hello’ , I cut the purple mat and used a starburst die on it. I put it all together on an A6 white card base and added some sequins. Thanks for stopping by! Sandy

Snow-Flecked Wreath

Image
The photo for  The House That Stamps Built - DCC Challenge F321 is so pretty! I can just see that pretty wreath on the outside of the door with flakes of snow on it. So that’s what I decided to go with. For a nighttime look, I blended Distress Oxide Stormy Sky in the center of a piece of 4-1/4” x 6” cardstock and Chipped Sapphire around the edges & towards the middle. Then I added splatters using white craft paint. Next I die cut a bunch of different types of leaves in several shades of green; then the smaller wreath from the Shapabilities Woodland Wreath set, and the letter part of the CZ Design “Hello” die set in a lighter green. I also die cut the back part of the sentiment and the little snowflakes, using a Marianne Design Craftables die, in white. I glued the wreath, leaves, and snowflakes into a circle shape on the inked mat and then added the sentiment, some clear sequins, and attached it to an A6 white card blank. Thanks for stopping by! Sandy

Lavender Roses

Image
It was no contest as to what I would use for the  Simon Says: Favorite Technique challenge: Trapped Embossed Resist. I just love the effect you get, and it makes a great background for so many other techniques and designs! I have a rose print background stamp that I’ve had for a long time, but never used, so I pulled it out for this. After stamping it using Versamark ink and embossing it using a fine detail clear powder (Stampendous), I blended 5 different shades of purple Distress Oxide ink over the top & buffed it with a microfiber cloth. Next I pulled out my Cuttlebug, and die cut the letter portion of the Simon Says “hugs” set, and 3 copies of a rose outline die (another one I’ve had for ages), from lavender cardstock. Then I cut the back part of the “hugs” and a stitched rectangle from white.  I put it all together on an A6 white card blank and added some clear sequins. Thanks for stopping by! Sandy

Flower Circle

Image
For the  MFT Wednesday Sketch Challenge - Sketch 529 ,    I didn’t get too creative. I basically copied this design on the challenge web site by Courtney Kroeber. After stamping a 4” x 5-3/4” piece of white cardstock with the Altenew Tulips Outline stamp, I used my Cricut Maker to cut a 3” circle in it. From black cardstock, I also had it cut a 4-1/4” x 6” mat and the 2 pieces that went on either side of the circle. I then colored in the design on the 3” circle using Copic markers.  Once the white mat was attached to the black mat, I lined up the design on the circle with that on the mat, and attached the circle with black foam dots. I glued on the black pieces and embossed the sentiment in black. The sentiment is from the Simon Says Anna’s Flowers set. I decided the design on the circle, even though colored, was just a bit too dull, so I applied a layer of Glossy Accents just on the colored parts. It’s difficult to see here, but it’s all shiny now, which really makes it pop! After g

Textured Flourish

Image
The  Simon Says: Add Some Texture challenge gave me the perfect opportunity to try using modeling paste like I’ve been wanting. When I went back to find some tutorials they were mostly using texture paste or embossing paste. I have no idea what the differences are, but I have the modeling paste so that’s what I used. This is one tutorial, by Paula Cheney , that I read. I really like this flourish design, but I don’t have the stencil for it, so I had to get creative. I do have the Sizzix Mixed Media cutting dies, and one of those is a very similar flourish, although a corner design. I cut a piece of cardstock with that die twice, moving it the second time so I had better coverage for my card. Taping a 4” x 5-3/4” piece of white cardstock to my media mat, I put another piece of tape across it to divide it into 2 parts, top & bottom. I taped my homemade stencil on the top part and spread the modeling paste across it, filling in the stencil. After removing the stencil and tape, I s

Vellum Flowers

Image
The colors for the  MFT Color Challenge 159 and the SugarPea Designs Clear Stamp - Mix It Up Challenge #76 are almost identical and I wanted to make something special for my nieces birthday, so when I saw this tutorial by Jennifer McGuire I thought they would combine really well. I began by cutting vellum and lavender cardstock, making the vellum 3/8” longer than the lavender and creasing it at the point that would make them the same length. Using my Cricut, I also cut a piece of white cardstock 2.75” x  7”, creasing it halfway down, and had a verse & frame drawn on. I also cut 2 thin frames of lavender that would fit around the folded card. Using the Picket Fence Peony Bouquet stamp set, I silver embossed a whole peony flower in the middle of the vellum. Next I embossed peony blooms around the rest of the page with Lindy’s Gang Magic Moon Pearl embossing powder. Once set, I colored in the central peony using Copic markers. I also silver embossed the sentiment on a strip of laven

Spring Bouquet

Image
The  MFT Wednesday Sketch Challenge - Sketch 528 gave me an opportunity to try a cut piece design, where you stamp on several cut & layered pieces of cardstock. I used the Altenew Tulip stamp and cut the cardstock to match the sketch. After lightly taping the cut pieces together and stamping them, I colored the design using Copic markers. Using black cardstock, I cut pieces slightly larger than the colored pieces, a mat, and a strip for the sentiment.  I embossed the sentiment in gold and put everything together on a white base, then added some gold half pearls. Thanks for stopping by! Sandy

Silver Flowers

Image
For the  Simon Says: Resist It challenge, I did something a little different, for me. I used silver embossing powder instead of clear or white for my resist. I used the Simon Says Anna’s Flowers stamp set and stamped & embossed a few flowers on each side. Next I blended 3 colors of Distress Oxide ink, beginning with Tattered Rose in the middle, Aged Mahogany on either side, and Hickory Smoke on each end. After buffing it with a microfiber cloth, I added more flowers & the sentiment. You can see the difference between the flowers. I think it gives it more depth, don’t you? I attached it to a silver mat & then the white card base. Aren’t these colors gorgeous? I can’t take credit for creating the color combo. I saw it on another post. Thanks for stopping by! Sandy

Rose Gold Wreath

Image
This card is one I’ll be putting in 3 challenges: the  DRU Challenge #163 (I used an Impression Obsession Scribble Circle die); the MFT Stamps - Slimline Challenge - Winter Scenes ; and the Simon Says: Make A Slimline Card challenge. To begin I cut and scored a white card base, then cut 2 mats - the smaller one gray and the larger one of a silver linen cardstock. I die cut the scribble circle from rose gold mirror cardstock, one snowflake and the leaves from white cardstock, and another snowflake from vellum. Last, I die cut the hugs twice from gray cardstock.  After gluing the words together, I embossed them twice in silver. I glued it and the scribble circle on the gray mat, and poked a hole through it and the snowflakes so I could attach a rhinestone brad. After attaching the leaves I put it all together.  Thanks for stopping by! Sandy

Floating Hearts

Image
This card took a surprisingly long time to make. I made a number of them to send out and also to enter in the  Simon Says: Love Is In The Air challenge. I had some A7 Kraft card blanks & envelopes left from New Year’s and wanted to use them. Inspired by some cards from Simon Says I decided to use black print zentangle-type hearts and to zip it up a bit, foil and pop up the center one. I found this heart on Etsy , perfect! After downloading it, I pulled it into Cricut Design Space and enlarged it so I could weld it. It needed to be welded so I could slice it. After resizing and flattening it, I duplicated it.  This next part is what took so long, figuring out how to get all those hearts cut & fit onto a mat. I created a rectangle of 4 1/2” x 6 1/2” and arranged the hearts on top until I liked how they looked. One by one I put a heart on the rectangle in the space I wanted and sliced it.  Once all the hearts were sliced I added them to another rectangle and flattened it. I left

Vintage Rays

Image
For the  MFT Stamps Wednesday Sketch Challenge - Sketch 527 , I didn’t want to do sun rays like most probably would. Instead, I decided that a starburst card using blue papers would work well, and that I’d shift the center point to the left to make the focal point off center. After choosing 4 different blue paper prints I cut 8”-radius quarter-circles from each and then cut those into narrow wedges. Taking a piece of cardstock 4” x 5-3/4” (this is an A6 card) I glued on the paper wedges, with the points all in the left bottom corner, beginning on the left side and then around with the sides touching. Once dry, I trimmed along the edges of the cardstock rectangle. Looking at what I had, I thought it looked like an old-fashioned quilt and decided to go with a vintage theme. I cut an elongated quarter circle of white cardstock and then a slightly larger one of blue. I stamped a vintage bicycle on the white piece using Catherine Pooler Juniper Mist. Once dry, I blended over it using Dist

Busy Weekend Part 2

Image
 So, continuing... Card #4 was for the   Altenew Flower of the Month Social Media Challenge (carnations) and the SugarPea Designs Mix It Up January challenge. I was also going to enter it in another challenge that called for a slimline card but didn’t get done in time. Using the Altenew Carnation Outline Set, I stamped the main image 3 times on marker paper, with Versamark ink, and embossed them in gold. Next I colored them in using Copic markers and fussy cut them.  On a piece of white cardstock, cut to 3” x 8”, I used the Simon Says Fractured stamp with a Catherine Pooler Rouge ink pad to create the background. I had to stamp it twice, lining it up as best I could. I glued on the carnations and added on the sentiment embossed with Lindy’s Stamp Gang Candy Cane Red Gold. To finish, I attached some red rhinestones and a red mat before attaching it to the white slimline base. I also entered this card in  The House that Stamps Built - Anything Goes Challenge ~ J2021 . Card #5  was for

Busy Weekend - Part 1

Image
Last weekend I spent quite of time making cards (I also made a big batch of Chicken & Dumplings, yum!) and put all 6 on Instagram to enter in the various challenges. I’m just now getting around to posting here. Sorry!  Card #1 I made this card for the  Pinkfresh Studios JANUARY 2021 CHALLENGE - 2020 Challenge in Review . We were to make a card inspired by one of their posts from last year. I chose this card, created by Carissa Wiley, from the September 2020 Pinkfresh challenge. Pretty aren’t they? I love the ombré stripes. I don’t have that die so I had to improvise. I do have the Pinkfresh slimline stripes dies and a set of rectangular dies that I thought I could use together to get the same look. Since I decided to also use this card for the Lindy’s Color Challenge I used violet, deep blue, and soft gray for my color scheme.  I began by taking an approx. 6” x 8” piece of white cardstock and blending on Distress Oxide inks in Shaded Lilac/Wilted Violet, Weathered Wood, and Stor