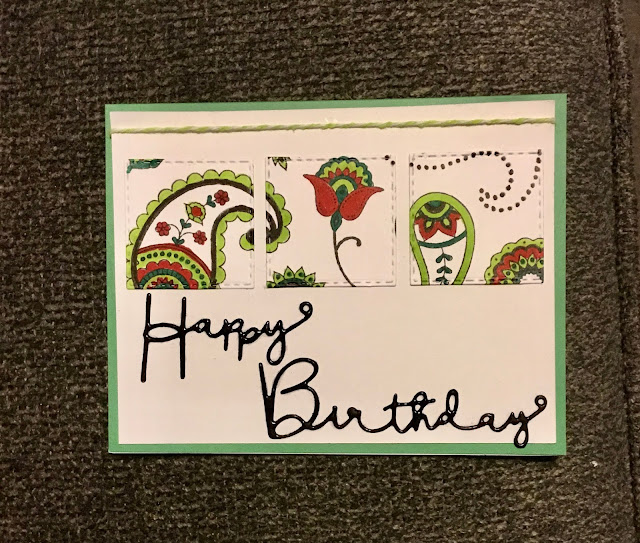
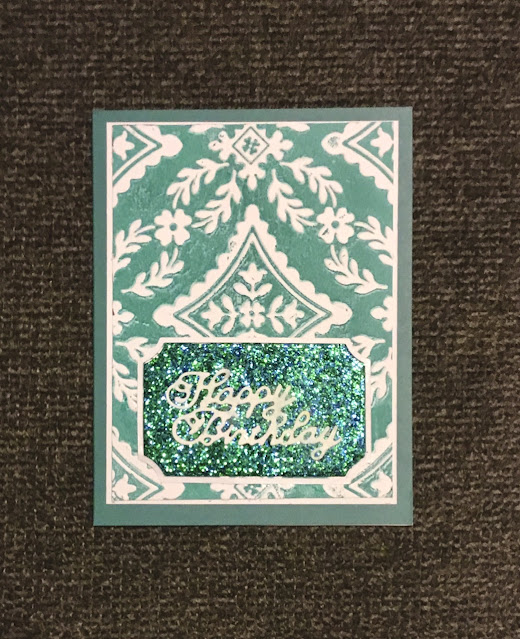
Posts

Showing posts from October, 2020

Today’s Tiles

Image
I made a card for the  Creative Confetti: Birthday Wishes challenge , and thought to enter it in 2 more Anything Goes challenges ( Simon Says: Anything Goes & The House That Stamps Built  - Anything Goes Challenge ~ O2820 ). I haven’t had a chance to use my Stampin’ Up Today’s Tiles stamp set & decided to use it for this card. I used Versamark ink and heat embossed the 2 parts of the design in Stampendous detail black and Lindy’s Stamp Gand Weeping Willow Green Gold on white cardstock. I trimmed them down and matted them on black. The small square I attached using an aqua pearl brad, and added the sentiment which was embossed in black too. Thanks for stopping by! Sandy

Autumn Wishes

Image
I made this card to fit 4 challenges: the  Creative Confetti: Emboss Like a Boss , the Altenew October Inspiration Challenge ,  The House That Stamps Built - Tic-Tac-Toe Challenge , and the Simon Says: Movie Inspiration Challenge . I needed a birthday card with an autumn forest, embossing, a frame, and that reminds me of a movie. Given the time of year, I thought of the movie “Practical Magic” and a magical fall theme. Here’s what I came up with. I found the mandala pumpkin design online (it’s kind of magical, isn’t it?), as well as a different version of the frame, that I made into a birthday frame. After cutting all the parts out on my Cricut, I embossed the background. Then I die cut leaves from scraps of the paper used to make the pumpkin. The background was attached to a slightly larger piece of white cardstock and the frame glued around the edge, then the corners trimmed to fit the frame. After gluing the pieces of the pumpkin together, I attached it to the background, added th

Another Halloween Card

Image
For the  SugarPea Designs Mix It Up Challenge #72 I thought 3 black cats would be fun. After all, my own Bunny Bear is a black kitty and she deserves some love!  Using the colors purple, orange, black, and white I came up with this. I just got the Stampin’ Up birch bark stamp & decided to use it for the background with Catherine Pooler Queen For A Day ink and the trapped emboss resist technique.   Next I downloaded some cute black cat images and cut them with my Cricut Maker. I also used the Print then Cut feature to make the sentiment.  After die cutting the pumpkins from orange cardstock, I assembled it all on a white card base & added some orange rhinestones. I also entered this in the  DRU Challenge #155 - Boo! and the Simon Says: Layer It Up challenge. Thanks for stopping by! Sandy

Layered Mandala

Image
For the  Simon Says: Layer It Up challenge, what better to use than a layered mandala? I’ve had this SVG pattern for a while & decided this was a perfect time to use it. It also worked great for the Power Poppy Creative Confetti: Sketch It Out! challenge. Here’s my card. Using my Cricut Maker, I cut the mandala layers from black, charcoal, medium gray, light gray and white cardstock. I then cut a piece of light gray cardstock to 4” x 2 5/8” and the card base from a darker gray.  Next I die cut the Happy Birthday from black cardstock and heat embossed it. After assembling the mandala, I glued all the components together and added some black rhinestones.  Unfortunately, the glue on the “Birthday” smeared and I wasn’t able to remove it with my rubber eraser like normal. I’ll probably take off the mandala and redo the rest when I have a chance. I do like the look of this card but maybe I’ll use a smaller Happy Birthday die next time so I can center the mandala better.  Thanks for st

Red & Green Are Not Just For Christmas!

Image
Using the colors from the  MFT Color Challenge 151 & the prompt from The House That Stamps Built  Designers Choice Challenge  O720 ~ Less Is More , I made this card. Using the Stampin’ Up Paisleys & Posies set I stamped a random grouping on a scrap of white cardstock and colored them with alcohol ink markers. Then I cut 3 squares in a row using a stitched square die.  Next, after die cutting the Happy Birthday from black cardstock, I embossed it twice in black. Once I attached the squares & words to a white mat, I decided the placement was off so I added a piece of twine across the top to balance it out and put it on a green card base. Thanks for stopping by! Sandy

Autumn Sunset Colors

Image
Here again I combined 2 different challenges and created a card to fit both: the  MFT Wednesday Sketch Challenge - Sketch 512 and The House That Stamps Built - Inspiration Palette Challenge - O2120 . By mixing the sketch from one with the colors from the other, this is the card I came up with. First, I made a base from gray cardstock and cut a piece of white 4 1/4” x 2 1/2” . I used Versamark ink to stamp the piece of white cardstock using a wavy background stamp and embossed it in silver. Next I blended Catherine Pooler Bellini and Tiara inks onto it and buffed the top with a microfiber cloth to remove the ink from the embossing. Next I used the Simon Says Love Tokens stamp & die set to stamp the ring sentiments with Versamark ink and embossed them in white. After stamping the center portion in black ink on butter yellow cardstock, I die cut them all using the coordinating dies. Then I went back over the embossing with a white gelli pen where some of it was damaged during cutti

Boo!

Image
I was so excited to make Halloween cards for the first time! The problem was deciding which of the many adorable stamps to use, but I just fell in love with Hello Bluebird’s Little Haunters. They are so cute!  There are a few challenges I will be entering them in:  the  Simon Says Stamp Monday Challenge: Spooky , the Stay Crafty With Hero challenge - Fall & Halloween , the DRU Challenge #155 - Boo! , and the Sugar Pea Designs October Meant To Be Sent Challenge - Fall Holiday theme . I wanted a dark forest background, and it was a lot of work to create, but I love how it came out. Here is the finished card (I made 8 of them). For the background I started with a 3 3/4” x 5 3/4” piece of white cardstock (these are 4x6” cards). I had some of the resist spray left from last week so I spritzed it on, dried it with my heat tool, then added some CP Twilight in a half circle on the bottom middle of the card using a sponge blending tool. I then spritzed again, dried, and added CP Stone Blue

Mum w/ Falling Leaves

Image
Here is a card I made for 2 different challenges: the  Pinkfresh Studio October Challenge - Fall/Autumn and the My Favorite Things Stamps - Wednesday Sketch Challenge - Sketch 511 . I also decided to decorate the envelope and enter it in the Simon Says Wednesday Challenge: Make A Card + Decorate An Envelope To Match as well. At first I had a difficult time figuring out how to use the colors in the Pinkfresh challenge (a medium blue, blush, teal, beige, & a goldish-tan) with a fall/autumn theme, but decided to use a blush chrysanthemum with dried leaves, and add falling leaves in the other colors. Here’s what I came up with. I started by creating a background using splatters of Catherine Pooler Stone Blue, Daydream, and Sand Castle on white cardstock, embossed it using a Hot Off The Press Falling Leaves folder. and then die cut it with a stitched rectangle to fit my card.  It’s difficult to see the embossing on the background, so here’s a closeup. I really like the added texture

Silver & Shiny

Image
Here’s the second card I made tonight. I’m entering it in the  MFT Stamps - Wednesday Sketch Challenge - Sketch 510 , the Simon Says: Make It Sparkle challenge (which I interpreted as including metallic), and the Lavinia World Challenges #37 - Anything Goes using stamps . The background is a modified galaxy or confetti background that I learned from this great video by Susanne Rose Art . I simply added some silver mica powder to the resist spray and stayed with teals and aquas for my colors. You can’t tell from the photo but the resist spots do have a bit of silver sheen to them. The Inks I used were Catherine Pooler Hot Tub, Aquatini, Mardi Gras, Skylight, and Daydream. Once it was dry I stamped the Lavinia Star Blossom stamp using Versamark ink and embossed it using Recollections Detail Silver embossing powder. I then simply trimmed it to size, attached it to a teal card base, added the 3 sentiment strips, and some clear sequins. Thanks for stopping by! Sandy

Embossed & Sparkly

Image
This card was made for the  Simon Says Stamp Monday Challenge: DRY EMBOSSING , but since I used a die cut label & sentiment, I’ll also enter it in the DRU Challenge #154 - Anything Goes . Hmm, it does have some definite sparkly stuff going on so let’s go for the Simon Says: Make It Sparkle challenge as well.   This was a pretty simple card to make. I simply inked one side of a Cuttlebug Diamond Flourish embossing folder with Catherine Poole r Aquatini ink and ran a piece of white cardstock through. I then trimmed it to approximately 3.75” x 5” and backed it with a slightly larger piece of white cardstock. I then took a piece of glitter cardstock and die cut it using the larger tag die from the Stampin’ Up Painted Labels die set. I cut another one and a Happy Birthday sentiment from white cardstock. I used the white edging from the tag die to frame the glitter tag and glued the white sentiment on top. Then I just put it all together on a teal card base. Thanks for stopping by!

Pretty Paisley Card

Image
I made this card to enter in 3 different challenges:  the  MFT Wednesday Sketch Challenge - Sketch 509 , the Simon Says Stamp Wednesday Challenge: Anything Goes , and the DRU Challenge #154 - Anything Goes. I used the Stampin' Up Paisley and Posies stamp & die set. This set is awesome! There are so many things you can do with it: create backgrounds, use it for focal points, use parts for embellishments... I used my Cricut to cut the basic pieces for this card. From smooth white cardstock I cut a 4" x 5.25" piece and a 3" circle from which I sliced off the bottom and side.  For the black cardstock I imported a scalloped circle and sized it so it was just larger than my white circle, then sliced off the bottom & side to match. I created the card base and one of the banners to cut in black as well. I made a second banner just a bit shorter to cut from pin dot paper. After cutting and scoring, I arranged the stamps on my stamp platform to cover the top portion

Steampunk Giraffe

Image
I didn’t have time to make a blog posting for this card in time for the challenge, so  just posted it on my Instagram account. This was my second entry for the  Simon Says Monday Steampunk challenge .  I used another graphic from Etsy, this time a giraffe. She’s so cute! I used the Cricut Print then Cut feature on my laser printer with  Hammermill Premium Color Copy Cover 80lb Cardstock, and then sprayed on a layer of   Americana® Acrylic Spray Sealer / Finisher in Gloss .   This   prevents the toner from smudging and allows some basic coloring, although you do need to be careful.  I colored in the giraffe with alcohol markers and embossed the goggles with Versamark ink and Recollections silver detail embossing powder.  Next I used watercolor pens in 2 shades of blue, swooshed them around using a water brush, then sprinkled on some Brushos in Ultramarine & Turquoise.   Once this was dry I put it upside down on some waxed paper, lightly spritzed it, then put down some more waxed pap