Posts

Showing posts from May, 2022

Bright Flowers

Image
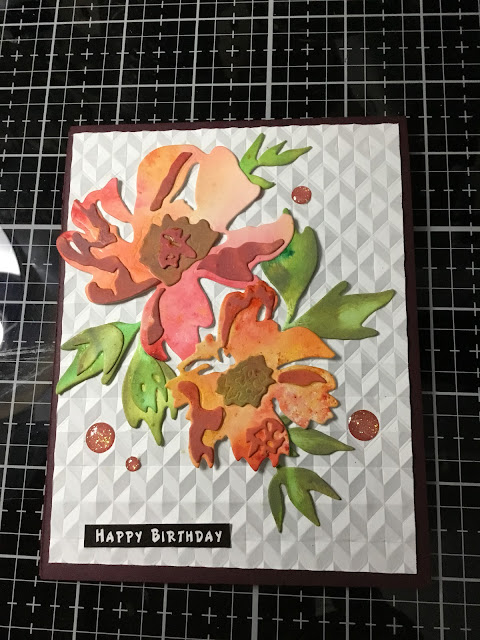
The Simon Says challenges for the week were  Simon Says Stamp Monday Challenge - Simon Says: Add Texture and  Simon Says Stamp Wednesday Challenge -  Simon Says: Layer It Up , so I created another card that I could use on both. I recently got the Sizzix Brushstroke Flowers #1 Thinlits Die Set and decided to use some of my Brushos with them.  I used three 4.5”x6” pieces of watercolor paper and sprinkled one with greens, one with reds & oranges, and the third with oranges and yellows, then spritzed them with water. I let the colors swirl around a bit then let them dry overnight.  The next thing I did was use the dies to cut the leaves from the green, the large flower from the red, and the smaller flower from the orange paper. I colored some of the pieces with Distress Oxides using small sponge blenders and then glued them all together. Using the Altenew Angled Mosaic embossing folder, I embossed a piece of A2 cardstock and trimmed it down 1/4”. I then attached it to a burgundy A2 to

Pretty in Pink

Image
For the  Simon Says Stamp Monday Challenge - Simon Says: Add Texture I decided to use a stencil and modeling paste to create texture. I’ve had some good luck with adding embossing powders to the modeling paste, getting really interesting looks. I looked through my embossing powders and found a Ranger Blush Pearl powder that I don’t think I’ve used before, so I went with it. I’m trying to go through my supplies and use things I haven’t used before. On that same note, I have a Simon Says Stamp stencil, Spring Boho Circle, that I haven’t used before either, so took that out. I began with a piece of 4.25 x 5.5” white cardstock and blended Distress Oxide Victorian Velvet over it. Next I spritzed some water on it and dried, then spritzed some Avery Elle shimmer spray over it and dried. That gave me a shimmery textured background which I taped my stencil over, then spread Liquitex light modeling paste over the stencil using a palette knife. When I removed the stencil I had the stencil des

Memorial Day 2022

Image
I love poppies! So when it comes to Memorial Day I tend to turn to them. This year I used Paper Rose’s Modern Poppy stamp.  Since I was making multiple cards, and I didn’t want to use up my Copic markers, I purchased the Nuvo  Creative Pens Rich Reds set on sale. It’s a good thing since I used them all up. Now, I did a number of things wrong here. First I stamped the design using Ranger Archival Ink in black. I used clear embossing powder over that, so here are 2 no-no’s. Archival ink is a pigment ink so it’s not safe for alcohol ink markers, it will smear, and you’re not supposed to use markers with heat embossing as it can ruin your markers. I hoped the clear embossing would help prevent the smearing, and it did for the most part. Also, I wasn’t planning on keeping the red markers so I didn’t care so much about the embossing.  I did use my Copics for the greens and yellow and they seem to be ok.  The paper I used was Hammerhill Premium Color Copy 80lb. Cover.  I got it to use with my

Happy Cats

Image
I needed a masculine birthday card so, after looking through my collection, I decided to use an argyle stencil set from Pinkfresh Studios, and a Stampendous Laurel Burch stamp. For the argyle stencil I used Distress Oxide inks in Faded Jeans, Weathered Wood, and Shabby Shutters. It turned out smaller than I thought it would but you could go back and move the stencils over to make it a bigger size if you wanted to.  I decided to use it as a focal element instead of a full background so it was fine.  I stamped both the single and triple cats from the Stampendous stamp set “Feline Blooms, and the Happy Birthday sentiment as well, using Ranger Archival ink in black. I colored in the cats using Copic markers and then fussy cut them. I trimmed the sentiment into a strip.  On an A2 medium gray card base, I used a tape runner and attached the argyle mat. The cats were mounted using foam dots, and then the sentiment strip with tape runner. I added some enamel dots in several colors to finish of