Posts

Showing posts from May, 2021

Log Cabin

Image
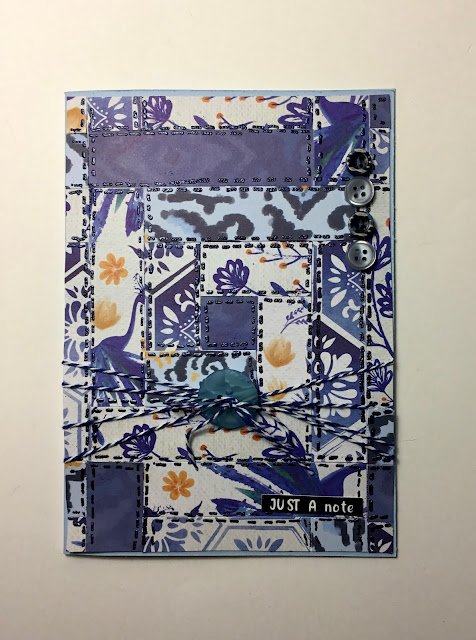
For  The House That Stamps Built - Theme Challenge M1221 ~ Sew Special , I thought of doing a quilt design. The good old log cabin quilt is one of my favorites, so that’s what I went with. I began with 3/4” strips cut from 5 coordinating papers and a 4.375”x6.125” piece of white cardstock. I cut one square to begin and put it in the center of the mat. From there I used a tape runner around it then pieced on 4 more strips and trimmed them with a craft knife. I continued around with longer strips and then started making them shorter again until it was complete.  Next I used a Ranger black embossing pen to add the “stitches” and embossed them using Ranger navy e.p. so they would be dimensional. I did this in several sections to make it easier & prevent drying or smudges. After trimming around the edge of the mat, I added some blue striped butcher’s twine and buttons, and a sentiment strip. I attached it to a light blue A6 card base to finish it off. I’ll enter this in the Simon Says

Floating Frames Cards

Image
I’ve used this technique once before and was pretty happy with the results, but at the time thought that the Altenew painted flowers stamps would work better. When I saw the Altenew inspiration challenge it all came together. The floating parasols reminded me of the floating flowers, & the colors would work beautifully.  I used Catherine Pooler inks in Melon Ice & Garden Party, Bellini & Orange Peel, It’s a Boy & Stone Blue, and Coral Cabana & Samba to stamp the layered flowers then cut them with the coordinating dies. I arranged them on a light blue mat to get a good layout, then used Glad Press & Seal to hold them together while I cut them with a rectangular die.  After separating the 2 sections, I added pieces of foam tape to the back of the flowers & leaves and mounted each on a light blue mat. After removing the Press & Seal I added dots with Nuvo drops. I wasn’t happy with the placement of the center section, so I trimmed around it and added a lig

Red Geraniums

Image
This is a card I started a couple of weeks ago & finally put together. The geranium is a digistamp from Power Poppy . I just love their designs and the price point can’t be beat! I printed it out, sprayed it with a fixative, and colored it with Copic markers. After matting it in black and putting on a green card blank, I added some black rhinestones.  This Wednesday’s Simon Says Challenge is Anything Goe s, so I’ll enter it in that, and in the  Stamping Sensations - Beautiful Blooms challenge. Thanks for stopping by! Sandy

Memorial Day Poppies

Image
When I was planning out my Memorial Day cards, I came across 2 items that inspired me. The first was a card on Bobbi’s Treasure blog . I love the look of the different embossing patterns. It’s subtle but distinctive.  I used my Cricut to cut apart navy mats of 4-1/4”x6” with room for the red to show through.  My second inspiration was a Memorial Day poem I came across.  We cherish too, the poppy red That grows in fields where valor led,  It seems to signal to the skies That blood of hero’s never dies — Maina Michael So, poppies! Out came my Stampin’ Up Peaceful Poppies dies. I have gotten so much use out of this set!  I die cut the poppies in 2 shades of red, and the leaves in 2 shades of green. I glued everything together and added the verse to the inside.  I’ll be entering this in the  Simon Says: Use Dies and/or Punches challenge and the Stamping Sensations Beautiful Blooms challenge. Thanks for stopping by! Sandy

Seahorse Thanks

Image
I’ve been working on this card on & off for a couple of weeks now, not sure how to finish it off. I was looking for a beach or ocean theme for the  Lindy’s Gang May Seaside Challenge and found this seahorse design on Etsy that I thought was really cool.  After downloading the svg, I pulled it into Cricut Design Space, sized it for an A6 card, and printed it out. Next I sprayed it with fixative, colored it with Copic markers, and fussy cut it. For the background I used a Lavinia Coral stencil, modeling paste, and 3 colors of Lindy’s Magicals from the Industrial Chic set: time travel teal, rusty lantern lime, and shabby turbine teal.  I taped the stencil and cardstock down, squirted some modeling paste in several spots, and dusted the Magicals over the top. When I used a palette knife to spread the paste, the colors were activated and spread around too. After removing the stencil and letting it dry overnight, I trimmed it to 4” x 5.75”.  I cut some coral, seaweed, and bubbles usin

Blue Butterfly

Image
For the  Simon Says: Things With Wings challenge, I really only have butterflies right now, so I wanted to think of a different way to use them. I settled on one large butterfly stamp that I’d use with the Jacob’s Coat technique. I began by cutting 2 mats of Bo Bunny twin dots paper in navy, one 6” x 4.25” and one 3.75” square, and 2 in white, one 5.75” x 4” and one 3.5” square. On the white square I blended Distress Oxide inks in Tumbled Glass, Twisted Citron, Spun Sugar, and Milled Lavender. I set it with a heat gun and then stamped over the top with Versamark ink using the butterfly stamp and embossed it with clear embossing powder. Once cool, I blended over the top with Chipped Sapphire then Black Soot and buffed off the stamped portion. After attaching all the mats to a white A6 card blank, I cut another small rectangle of the Bo Bunny paper and embossed the sentiment in white. I attached it and kept the rest of the card clean. Thanks for stopping by! Sandy

Framed Vellum

Image
For the  MFT Wednesday Sketch Challenge - Sketch 540 I decided to use this card I saw for inspiration. I like how the embossed vellum looks over the ink blending and the color choices. Here’s the sketch: I decided to split the blended section into 4 parts, pop them up using white cardstock, and put the vellum over the top. First I took a half sheet of cardstock and over part of it blended Distress Oxide inks in Aged Mahogany, Barn Door, and Crackling campfire.   Next I cut it into 4 pieces each 3.5”x1.125” with a quarter inch in-between. I stacked them each on 3 pieces of white and attatched them to a burgundy mat.  After cutting a piece of vellum 3.5”x5.25”, I ran it through my Cuttlebug in a Cricut Anna Griffin Aviary embossing folder. I decided to try a technique I saw recently for adhering vellum using a sheet of double-sided adhesive. Since it covers the entire surface you don’t seethe adhesive like you normally would if you just used pieces.  Well, I got the adhesive on the vell

Daffodil Bouquet

Image
I finally purchased a few Power Poppy digistamps. They have so many gorgeous ones and the price point is great! The only disadvantage is that you can’t heat emboss them like regular stamps. Since heat embossing and Copic markers don’t go together, I’m only missing out on watercoloring. When using watercolors I do like an embossed image, it just makes it so much easier.  So, for the  Simon Says Monday Challenge: Feminine I chose to use the Daffodil Bouquet image. I pulled it up in MS Word and followed the directions on the Poppy Stamps web site. It came out great (we have a laser printer) and I sprayed it with a fixative so the toner wouldn’t smear. I colored it with Copics using some tips from Vanilla Undercover like this one. Her site is awesome if you’re just starting out with Copic markers. After trimming it to size, I matted it with 2 colors of marbled paper, popped it on a white A6 card base, and added some rhinestones and pearls (for the pin heads). I’m really happy with the w

Stacked Spirals

Image
Do you remember the Spirograph? It was a toy that let you make spiral designs using different colors of ink pens. I loved mine when I was a kid. Altenew has a stamp & die set that lets you create similar designs.  When I saw this video by Jennifer McGuire I had to try it. Mine didn’t turn out nearly as good, of course, but they’re still cute.  I made them in 3 shades of blue. Since Jennifer gives you all the details, I won’t here. The only comments I have is that her die seemed to cut more pointed than mine and I apparently need to reink my Unicorn ink pad.  I still may go back & add the little white dots too before I enter them in the  DRU Challenge #168 Anything Goes . Thanks for stopping by! Sandy

Garden Collage

Image
For the  MFT Color Challenge 164 I decided to use the colors in a small way instead of in large swathes. Here are the colors: For my stamp, I went back to an old favorite, Garden Collage by Stampin’ Up. I stamped it on marker paper using MFT Extreme Black and colored it with Copics. Next I made a black A6 card base, two half mats of white, and a 2”x4-1/4” piece of black & white striped paper. I cut the colored design with a stitched circle die and then the next size circle up in black. I glued the collage onto the black. The 2 half mats I ran through 2 different embossing folders: one polka dots and the other a swirly design. I attached them to the base and the striped paper over the middle. I added the design and sentiment to finish it off. I’ll enter this in the Simon Says: Anything Goes and The House That Stamps Built - Anything Goes Challenge ~ A2821 challenges as well. Thanks for stopping by! Sandy

Vellum Poppies

Image
For this challenge I pulled out my Poppy Moments and Simon Says Keep Smiling die sets. Here is the sketch for the  MFT Wednesday Sketch Challenge - Sketch 539 . Wanting to use whites & vellum with my die set, this is the color palette I chose. After looking through my papers, I couldn’t find anything with multiple blues that was light enough, so I went with a simple patterned powder blue and cut a mat to go with the white slimline card base I made. Next I die cut the outside of the poppies from white, the backs from vellum, and the centers from black cardstock. I also cut 2 sets of the sentiment & glued them together to give it some depth. I attached the powder blue mat to the base & added a row of lace washi tape. After attaching the flowers and sentiment, I added some opal sequins to finish it off. I’ll also enter this in the Simon Says: Anything Goes and The House That Stamps Built - Anything Goes Challenge ~ A2821 challenges. Thanks for stopping by! Sandy

Eleanor Roosevelt

Image
Upon seeing the  Simon Says: Add A Quote challenge I knew I had to use my favorite Eleanor Roosevelt quote. It’s been something I try to remember when things are rough. For the design I was inspired by a card by Yana Smakula . It’s fairly simple but so pretty! First I cut a light blue A6 card base, and black and medium blue mats. On the blue mat, I stamped the middle leaves from the Altenew Grape Leaves set with Versamark ink and embossed in gold. Then I used Distress Oxide Chipped Sapphire to blend from the outside in towards the middle, leaving the middle plain. I put the base & mats together, added the sentiment (which I made using Print Then Cut on my Cricut), and added some sequins & beads. Done! I’ll also enter this in the  Simon Says: Anything Goes and The House That Stamps Built - Anything Goes challenges. Thanks for stopping by! Sandy

Happy Anniversary

Image
Ok, so this is really early but I went ahead & made an anniversary card for  The House That Stamps Built - DCC A721 ~ Anniversary Card challenge .  I’ll save it (Oct. 1). I was going to go with something all elegant, but then I saw Mr. Grumpy when I was going through my stamps and went for a combo style.  I started by stamping the Altenew Pattern Play Diamonds stamp on watercolor cardstock with Versamark ink and embossing it with Ranger Navy embossing powder.  Using a blue metallic watercolor from my Cosmic Shimmer Antique Shades set, I painted the diamonds making them darker on the bottom. Once dry, I used a black Ranger embossing pen to color in the dots and emboss in gold. I cut it to a size that would fit on an A6 card, trimming off the less desirable parts. This left a piece 4-1/4”x5-1/4” on which I went around the outside with a gold metallic marker. Next I stamped Mr. Grumpy on marker cardstock and colored it using Copic markers. I cut it with the coordinating die and went