Posts

Showing posts from January, 2021

Pink & Blue

Image
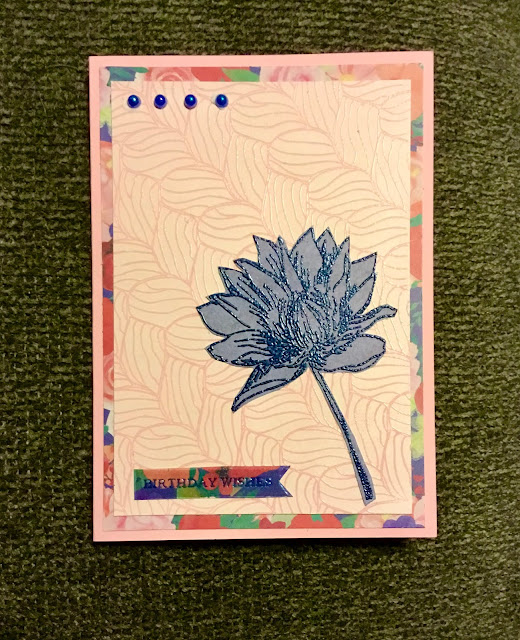
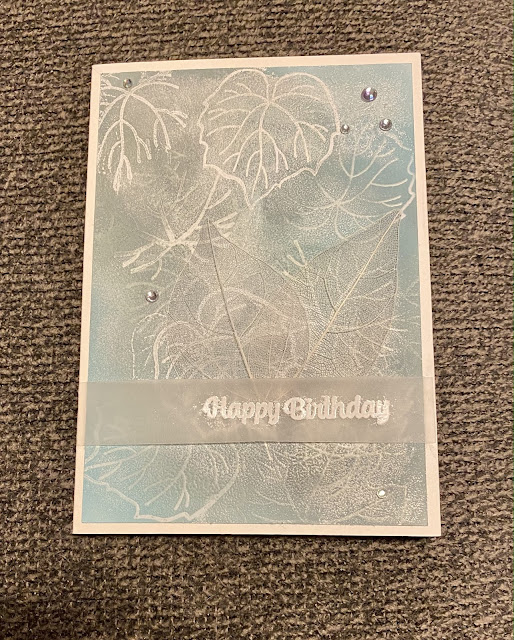
This is the card I made for the  Simon Says: Make Your Own Background challenge. I just got the Simon Says Chunky Sweater stamp, which was perfect for this. As for the rest, I dug up a floral print paper I’ve had for a while and used it for my inspiration. For the background I started with a piece of pink cardstock, stamped it with Versamark ink, and heat embossed it using Lindy’s Stamp Gang Cosmic Pink Blue embossing powder. Next I used a blending brush to cover it in Tsukineko Brilliance Moonlight White ink. After letting it dry for a few minutes, I buffed it using a microfiber cloth. Next I stamped and heat embossed a piece of blue print cardstock with a lotus flower stamp and Ranger Navy embossing powder. I then fussy cut it. The sentiment I stamped & embossed on a piece of the floral paper. I used the same pink embossing powder. Since the words didn’t show up all that well, I used a blue watercolor brush marker to color them in. After everything was put together, I added

Lace & Plaid

Image
For the  MFT Wednesday Sketch Challenge - Sketch 525 I remembered an old lace cutting die that I have that I could use to make the stripes. Then I decided to use a Simon Says Crackle stamp for the background, which would also make this card a fit for the Simon Says: Make Your Own Background challenge. In addition, I figured I’d use up the rest of that sheet of plaid paper from my last card. I blotted Distress Oxide Aged Mahogany and Tea Dye inks randomly on the Crackle stamp and stamped it on white cardstock. Next I die cut the lace strips from burgundy cardstock and cut a mat of the plaid paper. On a small piece of the plaid paper I heat embossed Happy Birthday using Stampendous Aged Scarlet Frantage Embossing Enamel. I then cut it to a good size. I attached the mats to a white card base, then glued on & trimmed the lace strips. After attaching the sentiment I glued on a wooden button.  Thanks for stopping by! Sandy

Gears & Plaid

Image
For the  Simon Says: We’re On A Roll challenge I decided to use my Hobby Solutions gears embossing folder and a pretty burgundy and tan plaid paper that I’ve had for a while. I blotted Distress Oxide Frayed Burlap ink on one side of the embossing folder, and lightly sprayed my Kraft card stock with water (putting the dry side towards the ink) and ran it through my Cuttlebug.  I don’t know what happened to give it that oxidized look, but I love it! Wanting to keep it simple, I die cut the sentiment from both burgundy and Kraft card stock using my Memory Box Grand Happy Birthday die.  After putting it all together, offsetting the words, I glued on some beads.  I just realized this would work for the  Simon Says: Make Your Own Background challenge too, so I’ll be entering it in that as well. Thanks for stopping by! Sandy

Red Blooms

Image
My last card for the weekend is a slimline card I created for the  MFT Stamps - Wednesday Sketch Challenge - Sketch 524 .  I didn’t want to use plain circles of some sort, and I remembered my Stampin’ Up Blended Blooms stamp. It turned out to be the perfect size.  I started with a white cardstock mat that I embossed all over with the Blended Blooms stamp, Versamark ink, and Hero Arts White Detail embossing powder. Next I stamped 3 flowers on alcohol ink cardstock using MFT Extreme Black ink. I then colored in the flowers using Copic markers and fussy cut them.  After attaching the flowers to the mat and trimming the ends, I added a sentiment strip and put it all on a red card base.  I’m also going to enter this one in the Simon Says: Layer It Up challenge. Thanks for stopping by! Sandy

Faux Batik

Image
For card #3 this weekend, I was looking for ideas for a couple of “anything goes” challenges  when I saw a tutorial on Batik Stamping by Norine Hope . Her cards were so beautiful I immediately wanted to give it a try.  So here is the card that I plan to enter in both the  Lavinia World Challenges #44 and The House That Stamps Built - Anything Goes Challenge ~ J621 .   I used the Altenew Grape Leaves stamp & die set, with Distress Oxide Inks in Tumbled Glass, Iced Spruce, and Weathered Wood. For the embossing I used Versamark ink and Hero Arts White Detail embossing powder. When done, I attached it to a white A6 card base. I then embossed the Happy Birthday on a strip of vellum and attached it by putting a thin line of glue right on each end of the vellum & sticking it to the card.  Lastly, I added 2 cream color skeleton leaves and some clear rhinestones.  Thanks for stopping by! Sandy

Snowflake Layers

Image
The Wednesday Simon Says challenge,  Simon Says: Layer It Up , gave me a chance to use some of my newer dies. I decided to use the colors from the MFT Color Challenge 157 again so I could enter it in that challenge as well. To begin, I cut a piece of white cardstock 2 7/8” x 4 7/8” and a piece of chocolate cardstock slightly larger.  Using Versamark ink, I stamped the white cardstock with my Hero Arts Snowflake Big Bold stamp and embossed it with Hero Arts Detail White embossing powder. I then blended on Distress Oxide Inks in Walnut Stain, Antique Linen, Stormy Sky, and Weathered Wood. Next I used Kraft cardstock and cut 2 strips approximately 2 1/2” wide. I used a Simon Says Detail Petal die with my Cuttlebug on these and cut them so that I would have a strip that matched the height of my card base. I also cut a Detail Medallion from the Kraft cardstock using another Simon Says die.  I put everything together on a chocolate color A6 Card base, then added some rhinestones and a senti

Watercolor Carnations

Image
This is the first of 4 cards I made this weekend. I’m trying to build up my birthday card stash, so all 4 are birthday. I made this card for the  MFT Color Challenge 157 . I also plan on entering it in the Lavinia World Challenges #44 . The colors were Summer Splash, Tropical Teal, Kraft, and Milk Chocolate. I’ve been wanting to use my new Cretacolor Aqua Monolith watercolor pencils so I chose an Altenew Carnation stamp that I thought would look pretty in aqua & teal watercolor.  I stamped the carnations on watercolor paper using Ranger Distress Embossing Glaze in Walnut Stain. Once set, I began coloring using the pencils. As I colored each section, I used a water brush to activate the pencil color & move it around a bit.  I colored the carnations in shades of aqua & teal and the stems in a moss & grass green. For the background I went around each image in brown and filled in with a tan/ocher color. The larger sections were colored using the side of the “lead” so it wou

Navy & Red Tiles

Image
When I saw the design for the  MFT Stamps - Wednesday Sketch Challenge - Sketch 523 I immediately thought of the Stampin’ Up Today’s Tiles stamp set. I’m trying to make more men’s and neutral birthday cards, so using red and blue would work well. Here is the card I came up with: After stamping the tiles using Catherine Pooler Juniper Mist and Rouge, I cut them out and adhered to a navy print paper. Next I cut out the birthday sentiment and the paisley design (from the Stampin‘ Up Paisleys & Posies stamp set) and embossed them twice with Ranger Navy Blue embossing powder. I adhered them to the card top.  After adhering a mat cut from a red & white striped paper to a white card base, I used foam tape to add the blue card top to add some dimension.  Not bad.  I’m also going to enter this into the  Simon Says: Something New challenge. Thanks for stopping by! Sandy

Purple Proteas

Image
I wanted to use my Hero Arts Protea Flowers stamp & die set, eager to do some coloring, and my new Taylored Expressions Play The Angle stencil. They would work well to make a card for the  DRU Challenge #160 - Anything Goes and the Simon Says: Something New challenges. I haven’t had a chance to use my Distress Oxide Inks for stenciling yet and I felt it would make a good background for the flowers. Here’s the card: Using Distress Oxide Dusty Concord & Shaded Lilac with the stencil, I blended them onto a piece of white cardstock.  Next, I stamped the Protea Flowers on a scrap of white cardstock using MFT Extreme Black and colored them in with Copic markers. I then cut them out using the coordinating dies. I cut the happy birthday sentiment using Script Word dies from The Ton on white paper and colored them with a Copic Marker.  Next I cut a mat from a purple print paper. I attached the protea flowers using foam tape, glued on the sentiment, and put everything together on an A6

Blue Wash

Image
For this challenge, the  STAY CRAFTY WITH HERO CHALLENGE #18 - Inspired By , I was inspired by this Del & Artie card .  Isn’t it pretty? Mine didn’t turn out nearly as well. I didn’t have the Payne’s Blue Gray Watercolor so, instead, used a mixture of Black & Prussian Blue Brushos. The stamp is from Hero Arts. It’s not bad, but just not as delicate and I couldn’t get the the background to have the same kind of washed look. I still like it. I will also be entering this in the The House That Stamps Built - Wednesday ~ Sketch Challenge D3020 and the Lavinia World Challenges #43 - Anything Goes . Thanks for stopping by! Sandy

Pink Heart

Image
Here’s a card I made for the  MFT Wednesday Sketch Challenge - Sketch 522 . I’m also going to enter it in the Simon Says: Sparkle and Shine Challenge . To keep it fairly simple I used a Simon Says Petal Plate on white cardstock. I cut the floral heart and assorted flowers and snowflakes out of a pink shimmer cardstock. The sentiment I die cut from both white and pink shimmer cardstock and layered them slightly offset. I then went over it with a Zig Wink of Stella shimmer pen. Thanks for stopping by! Sandy

New Year’s 2021

Image
I’m baaaack! I took a break for the holidays but did make and send out some New Year’s cards. They turned out so cute! I’m going to enter the  Simon Says: Sparkle and Shine Wednesday Challenge . 2020 was a difficult year for everyone, so when I saw the free sign messages for Taylored Expressions Big Grumpy stamp, I had to use it!  The background was made using the Taylored Expressions Party Popper Layering Stencil. I started by using Deco Foil Transfer Gel Duo with the ribbon-type layer and letting it dry overnight. Next I cut a piece of gold Deco Foil, smoothed it over the dried transfer gel (which had dried to a clear sticky film), and ran it through my laminator. After removing the foil sheet I used Distress Oxide Black Soot ink with the second stencil layer.  To make the Big Grumpys, I arranged several of the printed sign messages on one sheet using Google Docs, making sure I left enough room to stamp the image around each one.  After printing several sheets, I sprayed them with a