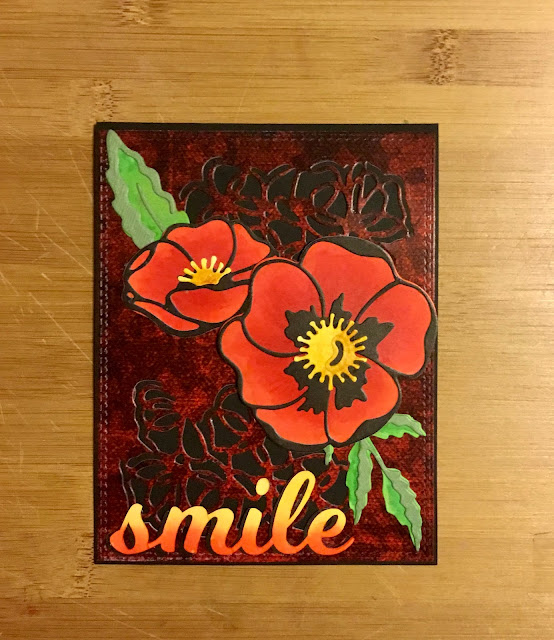
Posts

Showing posts from August, 2020

Boho Poppy

Image
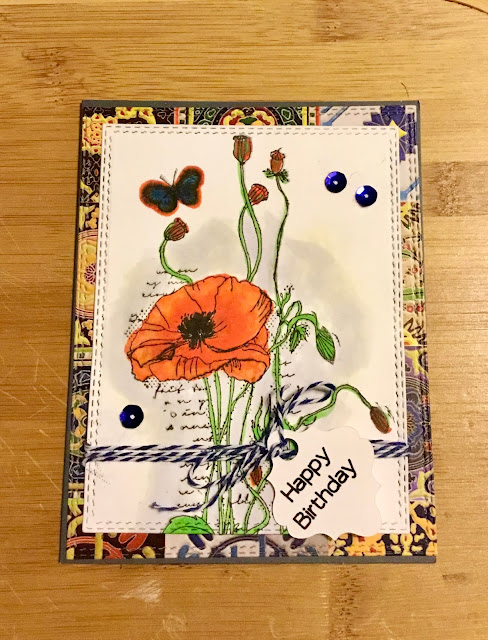
 This is the 3rd card I finished last weekend.  It was created for the  MFT Color Challenge 148 . The colors to be used were Grout Gray, Steel Grey, Orange Zest, and Blueberry.  Orange and blue make me think of poppies and I have a collage-style poppy stamp that I thought would work well.  I decided to use a printed paper mat and found a sheet in my stash that had a really interesting yellow, orange, & blue tile print. Score! Here’s the card: After stamping the image using MFT Extreme Black, I colored it in using alcohol markers. I used a pale gray marker around the outside of the image and blended it out.   I cut the stamped and printed card stocks using 2 sizes of double-stitched rectangles (Heffy Doodle). I wrapped a few lengths of navy-and-white butcher’s twine around the stamped mat and then attached both to a navy blue card base using Tombow MONO Adhesive Dots.  After adding a few blue sequins using glue, I tied a small sentiment tag on using another piece of twine. A little

Black & White Card

Image
 Here’s another one of the cards I just finished.  It was created for the  MFT Wednesday Sketch Challenge - Sketch 50 . I went with a black & white color scheme. I cut a black mat & used 2 stamps from a set of 4 strip designs in my stash. I stamped them with Tsukineko embossing ink and embossed them with opaque white embossing powder. Next I used a Lavinia “Dragon Pods” stamp in black ink on white cardstock and trimmed it. After adding the black & White Baker’s twine, I attached the components to a white card blank & completed it with a sentiment strip, some white beads and black square rhinestones. I decided the white card needed something, so ran a black marker on the edges. Thanks for stopping by!

Thistle (?) Botanical Card

Image
 Hey, all!  Finished a few more cards that I’ll be posting over the next day or so.  This one was created for the  Simon Says Stamp Monday Challenge: Beautiful Botanicals . I can’t decide if this stamp is thistles or clover of some type, but I really love the design and thought it would be perfect for this challenge. Here’s the finished card: After stamping the image, I used some metallic markers to add the color, making short little strokes to keep a textured look.  I went back over some parts of the stamped portion with a black jelly pen because the markers covered the black ink.  Next, I added some splatters using a black watercolor pen.  This didn’t work so well. Once dry the splatters looked pretty weak, so to jazz it up a bit I added some clear glitter.  I used a Zig glue pen to make some sweeping lines that went along side the curvy leaf things and then sprinkled on the glitter.   After the glue was dry, I added some lavender gems and the sentiment, then attached it to a black c

Hot, Hot, Hot...

Image
This card was created using the Stampin Up “Poppy Moments” die set. It’s one of my favorites! I’m entering it in the  DRU Challenge #151 - Baby It's Hot Outside and the HERO CHALLENGE #13 - Creativebug Inspiration . I took a sheet of dark red damask print cardstock and cut a mat using a Heffy Doodle Imperial Stitches rectangle, then cut a design in 2 corners with the Poppy Moments multiple poppy die.   Next I cut the poppy backgrounds using alcohol ink paper, the poppy outlines in black, the centers in yellow, and the leaves in 2 shades of green.  Using red, red-orange, orange, & blender alcohol markers I colored the poppy backgrounds. I added some yellow-gold marker to the flower centers and medium green  marker to the light green leaves, then glued the parts together. The “smile” was previously cut in both white & black cardstock using my Cricut Maker. I used red-orange & yellow alcohol markers on the white, then glued them together so the black makes a slight shadow

Quick Sketch

Image
 Here’s a quick one I put together from parts I already had made.  It’s for the  MFT Wednesday Sketch Challenge - Sketch 503 . I already had a number of backgrounds made with Brushos, a few of the flowers colored & fussy cut, leaves die cut, and the words pre cut using my Cricut Maker. I cut the background using a stitched square die, then completed the words by gluing 2 each of the words together and heat embossing them three times with Lindy’s Stamp Gang Carefree Verdigris embossing powder. All I needed to do then was glue it all together & add some sequins. Thanks for stopping by!

Red Sunflower

Image
This card I made in response to 2 different challenges.  There was a good overlap of the colors for both.  For the  MFT Color Challenge 14 7 I needed to use Whip Cream, Lemon Drop, Persimmon, and Milk Chocolate colors. For the   DRU Challenge #151 - Baby It's Hot Outside I needed to use hot colors (reds, oranges, yellows) and at least 1 die cut. Since I just received the “ Face the Sun ” stamp by Picket Fence Studios. and was excited to use it (gorgeous!), I decided it would work for both challenges. Here’s the card: I started with a gold card base & cut a mat from a dark red pin dot paper using a Heffy Doodle Imperial Stitches rectangular die. Then, after stamping the sunflower on alcohol ink paper using MFT Extreme Black ink and coloring it in with alcohol markers, I fussy cut it. I attached it using foam squares to add dimension, & glued on the sentiment. Thanks for stopping by!

Masculine Card #2

Image
 Ok. Here is the second masculine birthday card I made.  This one has more of a nautical theme.  I made it so it could also be entered in the  Simon Says: Grunge It Up challenge, as well as the Stamping Sensations August  Make it Masculine challenge. First, I used a stitched rectangle die to cut a mat of map paper and used Catherine Pooler Sand Castle ink with a dauber to smudge the outer edges.  Next I embossed a double globe on it in gold (Moxy metallic gold) from an astronomy stamp set .  . I cut the globe using a die from a travel set and then embossed it twice using Ranger embossing ink and Lindy’s Stamp Gang Groovy Granite embossing powder. The ship was stamped on gray cardstock using the Sand Castle ink, and embossed with Nuvo Clear Fine Detail embossing powder.  I wasn’t sure the Catherine Pooler dye ink would work, but it did!  I then used a clear embossing Pen to draw waves underneath & embossed it with the Groovy Granite embossing powder. The rope stamp, from the same

Men’s Birthday Card

Image
 Hi, ya’ll. I have 2 male birthdays coming up in September, so I’ve been working on some more masculine cards.  I’ll also be entering them in the  Stamping Sensations August  Make it Masculine challenge . Good timing, eh?  Here’s one I recently finished.  I really like how the shimmer of the metallic silver and more rustic granite embossing powder contrast. The depth & texture provided by the embossed mat and raised embossed heart add a special touch too. Lot’s of new stuff on this one.  I made a black card base and cut a 4”x5.25” mat in a medium gray.  I then cut 2 smaller mats in black and white.  I used  a “gear” embossing folder. First I dabbed a slightly darker gray ink on the raised portions of the folder (Memento Gray Flannel), added the mat, and ran it through my Cuttlebug.  This really highlighted the embossing. The gear heart design was purchased on Etsy  and cut out in triplicate using my Maker.  After gluing the 3 hearts together, I embossed them using 3 layers of Lind

Pink & Silver Flowers

Image
For the  MFT Wednesday Sketch Challenge - Sketch 502 , I decided to try one of the die sets I haven’t used yet. It has 2-layer flowers in 3 different sizes so would be ideal. Here’s the sketch: I cut the flowers in silver & pink shimmer paper, then used Catherine Pooler Pink Champagne ink to shade the centers. After gluing the layers together I connected them using pearl-head brads. I also cut some green leaves, a brown branch, and a stitched square in a greenish-brown wood grain paper using other dies in my stash. The card base was a dark rose. For the primary mat I used Lindy’s Magicals in Salt Water Taffy, which I blended with water then kind of blotched on with crumpled Saran wrap. Since I used regular cardstock it got a bit too wet, so I blotted it a bit with some paper towel, let it dry, and pressed it under a book for a bit. Then I used a finger dauber to add Delicata Silver around the edges. Finally I glued it all together and added a few pink pearls and a tag with a pin

Beach Memories

Image
Here’s the card I just finished for the Simon Says Summer Memorie s challenge.   I made the background using this great tutorial from Theresa Momber . The inks I used were used Catharine Pooler Stone Blue & Sand Castle, Memento Toffee Crunch, and Dew Drop Aquatic Splash. Along with 2 botanical grass stamps in Toffee Crunch, I used the Stampin Up Nature’s Wonders stamp set with Ranger Embossing Ink and embossed with Lindy’s Stamp Gang Don’t Scream Aquamarine After cutting out the embossed stamps I matted them with a light blue shimmer paper & added a hello cut with my Maker. 

New Blog & Summer School

Image
A new blog - the old one was wedding related so I decided to start from scratch with a new one that is more general.  You know me, I’m always into some kind of DIY, craft, or art project. My recent knee replacement has allowed me a lot of free time and I’ve taken up making greeting cards.  One of the things I like the best about this hobby is that it allows you to use so many different techniques.  There’s always something new to learn.  It also gives you fun things to send to friends and family.   One downside is all the supplies & tools you “need”, lol. I have huge shopping lists for things like ink pads of many types and colors, stamps, cutting dies, stencils, embossing folders, watercolor pens & pencils, Copic pens, embossing powders, cardstock, different types of paper, coloring powders & sprays, glues, adhesives, many kinds of embellishments, stamping tools, blending tools, cutting tools, etc.   I do get to use my Cricket Maker and Cuttlebug! That’s a big plus.  My mo