Posts

Fresh Blooms

Image
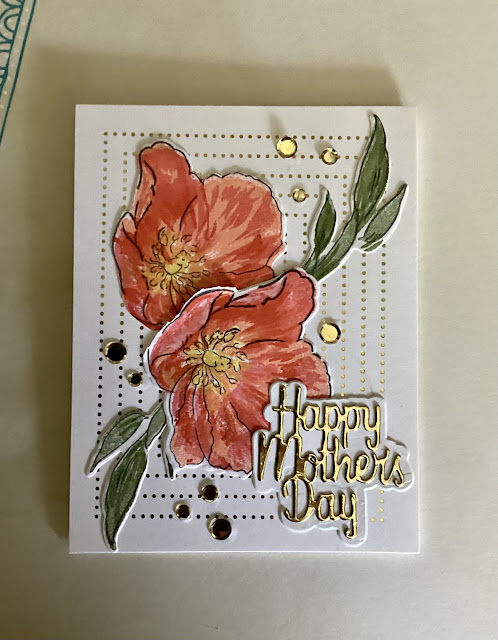
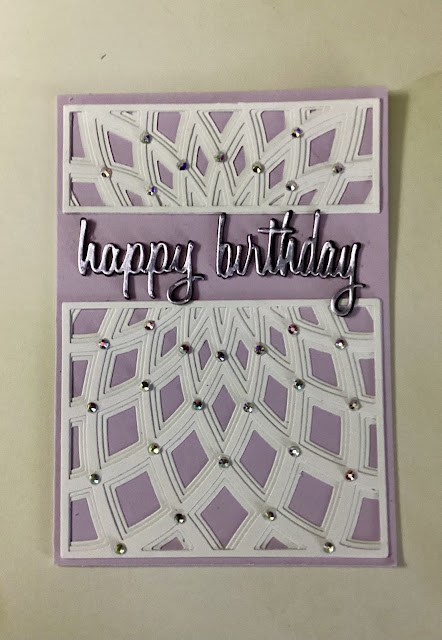
With Mother’s Day coming up I needed to make a special card. I decided to use the Altenew Fresh Bloom layering set (a gift from a friend). I haven’t used it before although I’ve had it for a while. I ordered the coordinating die set recently.  Since I also needed to make a birthday card, I just switched colors for the second card.  For the first card I used Catherine Pooler inks in Bellini, Polished, Coral Cabana, and Tutti Frutti.  The flower centers were stamped in Limoncello, Shea Butter, and Tiara. For all the leaves I used Sage, Eucalyptus, and Spruce. For the flowers for the second card I used Hot Tub, Aquatini, Skylight, and Mardi Gras.  Next I cut out the flowers and leaves with the coordinating dies.  For the background I did some hot foiling. This was my first attempt with my new Spellbinders Glimmer Hot Foil machine.  I actually got it a few months ago but wasn’t able to use it since it didn’t fit on my Cuttlebug.  I had to get  a Spellbinders Platinum 6 Die Cutting Machine

Meadow Thanks

Image
I needed to make a couple of Thank You cards today, so I pulled out my Altenew Meadow Burst Stencil Set.  I thought I could make something to enter in the Altenew April Inspiration Challenge .  I used Catherine Pooler inks in Lime Rickey, Sage, Eucalyptus, and Spruce, and Scrapbook.com inks in Havana Red and Cardinal Red.  The stenciling was done on Neenah Classic Crest Solar White 110 lb. cardstock using ordinary blending brushes. I started with a piece sized at 4 1/4 x 5 1/2” then trimmed it down to 3 3/4” x 5”. It was matted with  tropical green print paper.  The sentiment was cut using a Poppystamps Thanks outline die with the shadow in a sage cardstock and the letters in a light green glitter cardstock that I had in my stash. I finished it off with some green glitter enamel dots.  

Multi Metallics

Image
I worked on multiple cards this weekend, all inspired by this video by Jennifer McGuire. I started out with 4 different metallic cardstocks but only 3 turned out well enough to use.   For the striated silver cardstock I used the Altenew Floating Foliage 3D embossing folder and Catherine Pooler Seafoam ink. The sentiment was made using The Ton Script Word dies.  The frame is from the Altenew Mix and Match Frames die set.   For the Navy shimmer cardstock, I used the Altenew Charming Mandala 3D embossing folder and Catherine Pooler Juniper Mist ink.  The sentiment is from an old Happy Birthday die from my stash.  For the other components I used a Leafy Branch background die and Crystal Frames die from Memory Box.   For the silver cardstock I used the Typewriter 3D Texture Fades Sizzix embossing folder and Soft Granite ink from Hero Arts.  The sentiment is from The Ton Script Word dies.  The frame was made using a double stitched frame set from my stash.   So here we go.  Three more birth

Easter Time

Image
I had some backgrounds I created last year and never used so I decided to use them for my Easter cards.  The technique was one I used for Valentine’s Day last year.  It’s from a tutorial by Bibi Cameron .  This time I used blues with neutrals and as a final step swiped over the top with Champagne Delicata ink.  The embossing folder is the Memory Box 3D Blooming Sweet Pea.  The inks I used were Distress Oxide inks in, I believe (it was last year) Chipped Sapphire, Stormy Sky, and Black Soot, and sprays in Antique Linen and Speckled Egg.   The Easter Lily stamp and die were from Newton’s Nook .  I stamped them on Neenah Solar White cardstock using My Favorite Things Extreme Black hybrid ink and colored them in using Copic markers.  Next I die cut them using the matching die.   The sentiment is a die set from my stash.  I cut the words from champagne glitter and white cardstock so I could layer them to create some depth.  The shadow was cut in white. I glued them together using Bearly Art

Geometric Layers

Image
Birch Press has some really great layering dies and I loved the Dazzle Bevel Layer Set when I saw it.  There are two sizes you can use separately or together.  I used them together here.  I’m always looking for designs I can use for unisex or male cards.  I love flowers but you just need other designs as well.  You could use different colors for the 3 layers but I just used white for all of them this time.  I made 2 cards, one with a navy card base and one in lavender.  I used A6 bases because I already had them ready and I wanted a color border all the way around.  The dies are A2 size.  If you put them on an A2 base they go right to the edges.  I was going to use black sentiments for both, and cut enough for both cards, but it just didn’t show up on the navy so I cut white instead. I decided I wanted silver on both, so even though I had them finished with 3 layers on each sentiment I went back and added it on.   To add a little sparkle I glued irredescent gems on the lavender and si

Abstract Colors

Image
I just saw a Jennifer McGuire video  about heat embossing that showed a technique I wanted to try.  I’ve done emboss resist with inks before but not using the Lindy’s Magicals, of which I have 2 different sets (and I want to get more because I love them).   I cut a 9x12” sheet of Canson XL watercolor paper into 4 pieces. On 2 of them I used the Taylored Expressions Triangle Tetris background stamp with Versamark ink and heat embossed using Stampendous detail clear powder.   The two Lindy’s Magicals sets I have are Nantucket Pearls and Industrial Chic .  After taping down the paper, one for each set, I spritzed them with water, sprinkled on the powders, and spritzed again.  The one above used the Nantucket Pearl powders and the one below used the Industrial Chic powders. The sentiment strips were cut from black glossy cardstock.  The dies were from Aliexpress.  I thought the kind of graphic industrial look went really well with the design. I kept these fairly simple.  I cut the panels

Triple Pink Heart

Image
Birch Press has such beautiful layering dies.  For my Valentine’s cards I chose their  Flora Heart Layer Set and to use Altenew’s Pink Brilliance Glitter Gradient cardstock .  The cardstock is only 3” x 6” but that allowed me to cut 2 from each piece.  This glitter cardstock was great, it cut like a dream.  I used the Pink Diamond, Tourmaline, and Rhodolite.  I also cut a thin strip of the Pink Diamond to put on the side. The Love You sentiment die was from CZ Design .  I cut the shadow from vellum and the words from the Rhodolite glitter cardstock.   The background was embossed using the Sizzix Organic Petals 3-D embossing folder .  I cut it a bit smaller than the card blank and the cut a 1/4” strip off the side to add the glitter strip. The card blanks and envelopes I used were from Sizzix Surfacez in Ballet Pink.   I love the way this card turned out, don’t you?  I’m going to enter it in the Simon Says Wednesday Challenge and the Altenew 2023 February Inspiration Challenge .   Th